Creating Relationships
MythTapestry provides three methods for creating relationships, each suited to different workflows.
Method 1: Entity relationships tab
Section titled “Method 1: Entity relationships tab”The most detailed method. Open an entity’s detail page and go to the Relationships section.
- Click Add Relationship.
- Choose the direction — outgoing (this entity is the source) or incoming (this entity is the target).
- Search for the target entity using the autocomplete field.
- Select a relationship type from the dropdown (filtered to valid types for this entity pair).
- Optionally select a subtype if the type supports them.
- Optionally set temporal bounds — valid from and valid to dates using the world date picker.
- Optionally set strength (0–1 slider).
- Optionally fill in any extended properties defined by the relationship type.
- Click Save.
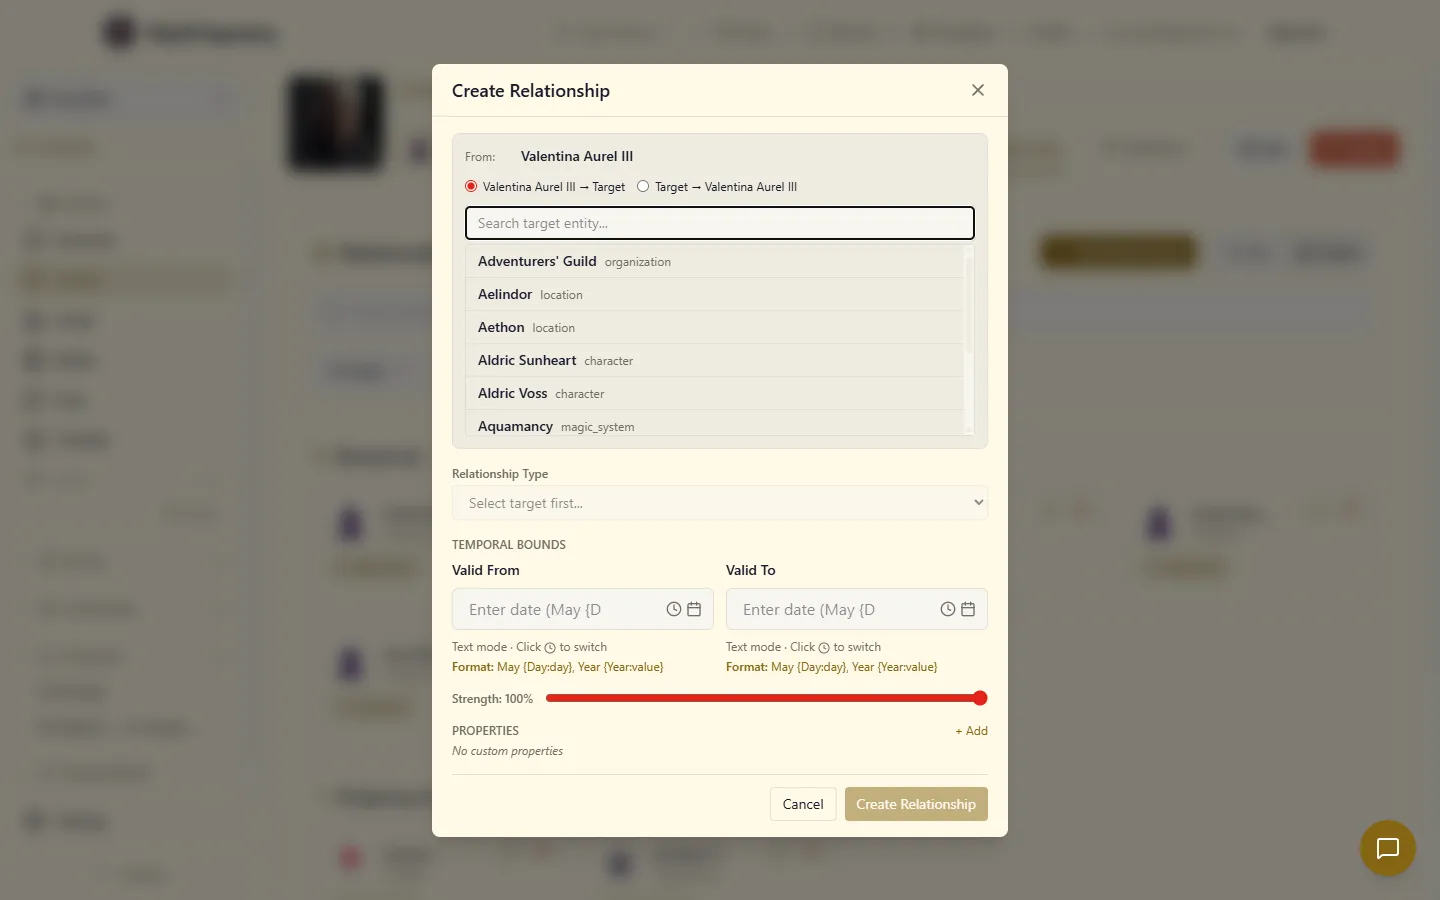
This method gives you access to all relationship fields including temporal context, strength, subtypes, and extended properties.
Method 2: Graph view edge creation
Section titled “Method 2: Graph view edge creation”A quicker method for connecting entities visually in the graph.
- Open the Graph view (world graph or entity graph).
- Right-click a node or use the edge action zone on a node.
- The quick relationship modal appears with the source entity pre-filled.
- Search for or click the target entity.
- Optionally swap direction using the direction button.
- Select a relationship type (filtered by the entity type pair).
- Click Create.
Method 3: Relationship matrix
Section titled “Method 3: Relationship matrix”For bulk relationship management between a set of entities.
- Navigate to the Bulk Relationships page.
- Select entities to include in the matrix (up to 20).
- The matrix shows an N×N grid with entities as both rows and columns.
- Click a cell to open the relationship dialog for that entity pair.
- In the dialog, view existing relationships or create new ones by selecting a type.
- Optionally add metadata.
- Save changes — creates and deletes are batched for efficiency.
The matrix is useful when you need to establish many relationships at once — for example, setting up the political relationships between a group of factions, or the family ties within a dynasty.
Matrix features
Section titled “Matrix features”- Relationship badges in cells show existing connections at a glance
- ”+” indicator for empty cells invites new connections
- Batch operations — changes are applied together for consistency
- Delete toggles — remove relationships directly from the cell dialog
Method 4: From the content editor
Section titled “Method 4: From the content editor”While writing, you can create a relationship directly from an entity link in the editor:
- Right-click on any linked entity in the editor
- Select Create Relationship from the context menu
- The relationship creation dialog opens with that entity pre-filled as one end
This is useful when you’re writing a scene and realise a relationship you’re describing doesn’t exist in your graph yet — you can create it without leaving the editor.
See Editor Context Menu for the full list of editor right-click actions.
Editing relationships
Section titled “Editing relationships”To modify an existing relationship:
- Go to the entity’s Relationships tab in the sidebar
- Click the relationship type label next to any relationship — it’s a clickable link that opens the edit modal
- Adjust any fields: subtype, temporal bounds, extended properties
- Save changes
Ending relationships
Section titled “Ending relationships”For temporal relationships, you can end a relationship rather than deleting it. This preserves the historical record while marking the relationship as no longer active. The “End relationship” action sets the valid_to field to the current date, so the relationship still appears when viewing the world’s history but is filtered out when viewing the current state.